To see a list of all your customers to whom you have issued licenses, select Customers in your side bar menu.

The Customers page is displayed from which you can add a customer and delete a customer account. You can also view and edit customer details by going to the Actions column:
Select the view
 icon for a customer to drill down to the customer level to view and further manage that customer.
Select the edit
 icon for a customer to edit that customer's details.
Use the Search  box to search the list of customers.
Columns that can be sorted display arrows  beside the column title. Select the arrows to sort a column in ascending or descending order.
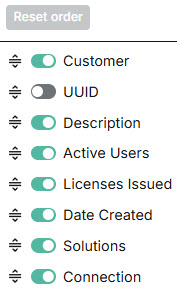
Select the column  icon to manage table columns. With the exception of UUID, all columns are visible and arranged in a specific order by default. You can add UUID to the display and rearrange the order by doing the following:

Slide the toggles off and on to hide or display columns.
Use the reordering
 icon to move columns up and down the list. This changes the left-to-right display. An item at the top of the list, for example, means that it will be the first column on the left. Select Restore default order to restore the columns to their default positions.
Resize columns by hovering your cursor over the column boundary you want to adjust until it becomes a resize
 cursor. Drag the boundary until the column is the width you want.
Note
Note that any changes you make here will remain, even if you leave the page.
The following columns are available:
Customer: Name of your customer.
UUID: Customer's Universal Unique Identifier, which clearly identifies each specific customer. This column is not enabled by default and can be turned on by selecting the column
 icon.
icon.Solutions: Icons displayed in bold show solutions that are licensed to your customers.
 Email Security: TitanHQ's email security solution, offering protection from targeted threats that arrive in a customer's inbox.
 Phishing Simulation: MSPs can set up and monitor phishing campaigns for their customers, helping them to recognize deceptive lures and phishing threats.
 Security Awareness Training (SAT): MSPs can schedule and monitor security awareness training for their customers, enabling them to become more aware of information security risks.
 Email Archiving: TitanHQ's automated email archiving solution.
Connection: Indicates if a customer is connected to a Microsoft 365 account. The
 label shows which customers are connected; the
  link highlights those customers who are not.
Select the Add connection link to begin Connecting and Configuring a Customer Account.
Actions: View and edit customer details.
To add a new customer, see Add a Customer Account.

.png)


 1.png)